
Why Do New Windows Leak at the Sill? The Missing Tray
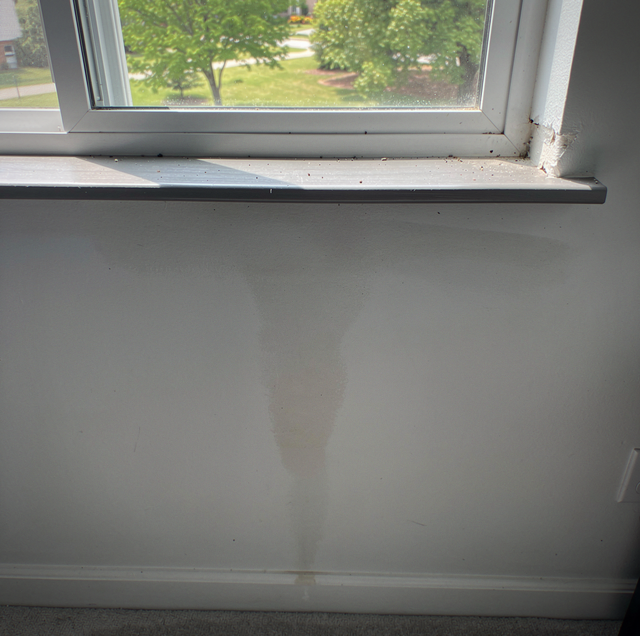
Your window went in four months ago. The glass is clean, the sash locks, your trim sits tight against the drywall, and after a long rain a dark line shows along the wall under your sill with a blister in the paint below it. Nothing at the top of the frame has ever been wet, and the fresh caulk line below it is unbroken.
You are looking at the exit, not the entry. Water at the bottom of your new window is almost never water that got in there. It came in higher, ran down behind your siding, and arrived at the lowest point in your opening. Whether you see it on your wall depends on what was built into that low point.
Where the Water Enters and Where It Shows Up
A wall sheds water in layers, and the flashing around an opening is the part of that system pointed at the hole you cut in the wall. Flashing's job is to direct any water that gets past the siding down and out of the walls before it can cause damage.
Down and out is the whole idea. Every layer laps over the one below it, so water always has a path downhill and outward. At an opening, that path ends at the sill, and the sill hands the water back to the outside.
What Goes Under a Window?
Under a correctly built opening, there is a pan, installed at the sills of windows and doors, the location most vulnerable to water intrusion. A pan is a shallow tray formed in the bottom of the rough opening, running the full width and turned up at both ends, so anything that lands in it has nowhere to go but forward.
The pan does not work alone. It has to integrate with jamb flashing and overlap the wall water barrier below it, so any water that leaks through or around the opening is collected and directed back out to the exterior. Three parts do that work: the pan catches, the jambs feed it, and the housewrap below carries what the pan releases down the wall.
Miss any one of the three and the other two still look finished from the street. A window leak at the sill has that shape by nature: the visible work is done, the trim is back on, and the layer that would have carried the water away sits buried beneath it all.
The Lap Order That Sends Water Back Out
Order is the whole trick, and it runs as four steps in one direction: pan flashing goes in at the sill first, then the window or door, then side flashing that extends over the pan flashing, and last, top flashing that extends over the side flashing. Nothing in that sequence is exotic, and nothing in it is optional. Each piece laps over the one below, so a drop landing anywhere on the outside of the assembly keeps moving down across a surface already shingled against it, and the last surface it touches on the way out is the pan. Reverse any two of them and the same stack funnels water into the wall.
Now put a defect in it. A head flashing left out, a jamb tape that stops short of the pan, a piece of housewrap tucked under the flange instead of over it: each of those lets water behind the assembly somewhere above the sill. None of them makes water appear at the top of your window, because water at the top has somewhere else to go. It goes down, and it stops only where the assembly itself stops.
So the bottom of the opening collects whatever fails above it, and the failure can be anywhere on three sides. A missing pan turns that arrival into an interior stain. A pan that is present and correctly lapped turns the same arrival into a few ounces of water running out over the flashing and down the face of the wall, where you never see it and never think about it again.
Why Sealant Across the Bottom Makes It Worse
The first response to a wet sill is almost always a tube of sealant, and it guarantees a repeat. A pan works by letting water leave. Run a bead across the outside bottom of the frame, and you have closed the only exit, so the next rain fills the tray and holds it there against wood you cannot see. A nuisance in the drainage layer becomes standing water.
Sealant has a place in the assembly. It belongs at the jambs and the head, where it backs up a flashing lap instead of standing in for one, and it stays off the bottom edge. A window caulked shut along the sill has had its drainage taken away by hand, and from your side of the glass nothing looks different, which is why the bead keeps coming back.
What a Replacement Into an Existing Opening Usually Skips
A replacement window goes into an existing opening, and that is where the pan drops out of the job. New construction gets its pan before the window, because the wall is open and the order is easy. A replacement crew works from the outside, into a hole with a sill in it, on a schedule counted in units, and pulling trim to form a tray takes hours.
A common outcome looks like this: new windows go in, but nothing is done to repair a rotted sill or address why it failed. The window is new. The sill under it was already failing; its cause was never found, and a new unit changes nothing about either.
Reading the Stain Line From Inside the Room
You can do useful work here without touching a ladder. Stand inside on a dry day and look at where the mark stops. A line that sits tight under the sill and fades quickly is water arriving at the sill and spreading along the apron. A mark that runs down the wall well below the opening has come through the framing and is traveling on the back of the drywall.
Timing narrows it further. Water that shows within an hour of steady rain has a short path, usually a head or jamb defect within a course of the opening. Water that appears a day later has traveled through absorbent framing. Write down the date, how long the rain lasted, and where your own mark started, then hand that to whoever opens the wall for you.
What the Crew Opens Up, and in What Order
The sequence runs inward, then outward. Interior casing comes off first, so the opening can be seen dry from inside; then the unit comes out; then the sill is checked for soft wood, and the housewrap below it is cut back and folded down. Only then does a pan go in, and only then does the window go back, with jamb flashing lapped over the pan and head flashing over the jambs.
A fall from a ladder is the real risk here, so have the window installer inspect the head flashing and jamb tape from a footed ladder while you stay on the floor.
Three things stand between your opening and the next stain: a pan under the unit, jamb and head flashing lapped over that pan and not under it, and a bottom edge left open so the pan can empty. Get all three confirmed while the opening is open, because none can be seen once the trim is back on.
Frequently Asked Questions
Almost none of it. The only flashing you can usually see on an installed window is the metal head flashing, the strip along the very top of the window trim, painted to match. Your sill flashing sits behind trim you cannot lift.
Yes. A deep sill has farther to drain, and the installation standard treats it separately: sloped pans are required when the sill depth exceeds 6 inches. Measure your own rough opening front to back before you order your replacement units.
A back dam is the raised inside edge that keeps water in the pan from reaching you. It is a strip of wood or beveled siding nailed along the back, inside edge of the rough opening, over the flap of housewrap. Without one, your pan drains in both directions, and one of those directions is your own floor.
No. The prescribed order puts pan flashing in before the unit goes in, so forming one under a window already in place means pulling that window, cutting the housewrap back, building the pan and resetting the unit. Ask your contractor to scope your job as a removal and reinstallation, not as a caulking visit, so you know what you agree to.
Often, yes. A stain that starts at one bottom corner points at the junction where your jamb flashing laps onto the pan, because a corner forces the tape to turn and a turned corner lifts more often than a flat run. A stain spread evenly along your whole sill points at the pan. Note which corner you see, and whether you get your mark within an hour of rain or a day later.
Those are weep holes, belonging to your window unit, not the wall. Water past the outer glazing seal collects in the frame and leaves through them. Never seal weep holes at the bottom of windows; they are designed to let moisture out of the window if it gets behind the glass. Check that the weep holes in the bottom frame have not been caulked or painted over. Paint them shut and your frame holds water you will never see.
A window replacement scoped from the opening outward — the sill, jambs and head checked before any unit is ordered, so the drainage path is built before the window goes in. Eagle Home Renovation Inc. serves Richmond and surrounding areas. License #2705181053. Call (804) 538-3334.